Successful calibration quick start guide
Introduction
Dracal Technologies' software suite offers a 3-point user calibration mechanism that is exclusively compatible with its measuring instruments.
Comprehensive documentation on the effect of 1-point, 2-point, and 3-point calibration and an article listing three tips on Dracal's calibration mechanism is already available.
Here, you will learn in a few steps how to successfully calibrate Dracal instruments in 3 points, whether you are an end-user, a calibration laboratory, or an integrator using command-line tools.
For end-users or calibration laboratories
Prerequisites
Reference measuring instrument, often more accurate than the instrument to be calibrated OR instrument on which the new instrument should be aligned
AND
The latest version of DracalView
Determine Calibration Points
1. Connect the instruments and let the readings stabilize.
Before taking any measurements, connect the reference or calibration instrument (here, a VCP-RTD300-CAL) and the instrument to be calibrated (here, a USB-TMC200k-CAL) for at least 30 minutes. This allows the electronics to stabilize. In this example, we are using a Dracal instrument to calibrate another Dracal instrument, but it is possible to use a standard from a different brand.
You can use the GraphView tab to confirm reading stability.
2. Decide on the three calibration points to use.
Typically, 3-point calibration ensures the best fit between calibration points. Choosing points that cover your measurement range (minimum, maximum, and intermediate value) is suggested. In this example, the target values will be 6°C, 25°C, and 100°C.
3. Start logging for both instruments.
You can start a log using the Logging tab. This will allow you to work with the .csv or .txt file created to establish calibration values.
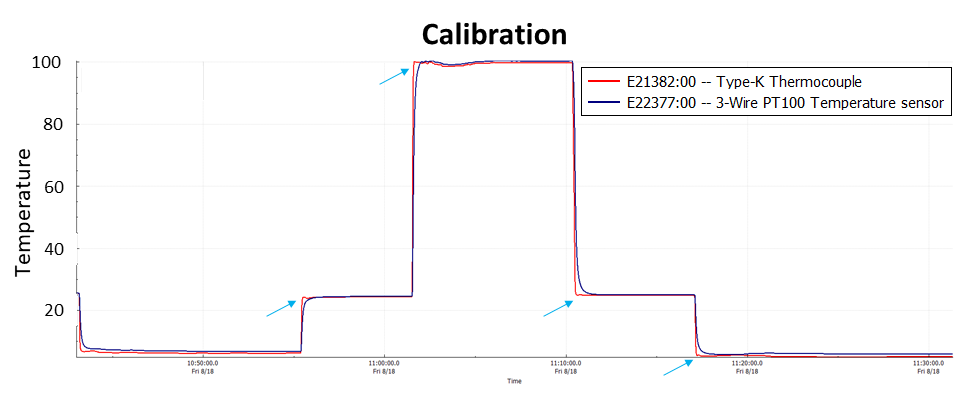
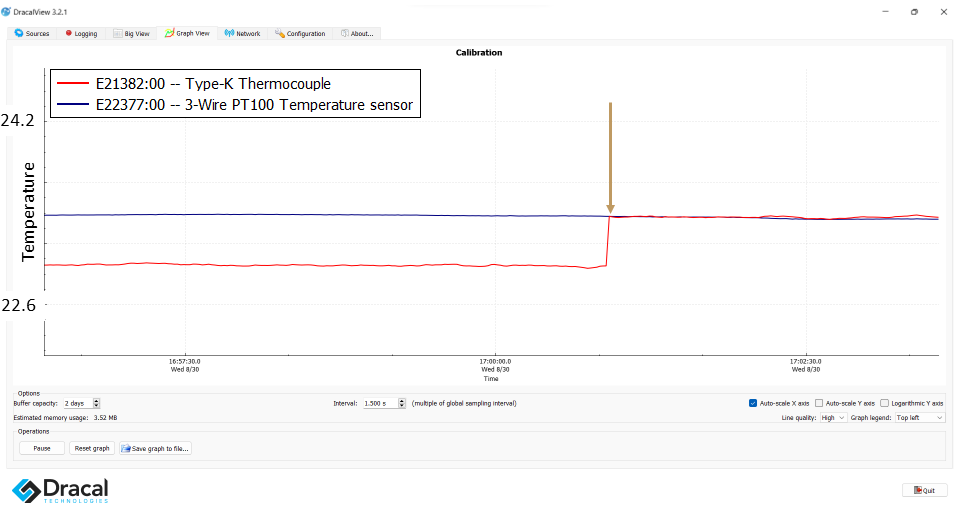
4. Place the instruments in the measurement conditions and wait for the readings to stabilize.
The graph below shows that temperature changes caused momentary reading errors on the thermocouple (in red), which are highlighted using light blue arrows. Also, during the 100°C measurement, there was an adjustment time before the temperature stabilized.
5. Stop logging.
6. Extract data for the three conditions from the logging file.
Choose the points where the difference between the two instruments is most consistent for a given condition while the reading is stable.
In this example, we chose the following points for calibration:
The lowest temperature reading stabilized at 6.20°C for the TMC200k and 6.70°C for the RTD300.
The reading stabilized at 24.35°C for the TMC200k and 24.51°C for the RTD300.

You will notice that the temperature never really stabilized at 100°C. That's why we averaged the temperatures over the time interval shown here. This average is 99.68°C for the TMC200k and 100.26°C for the RTD300.
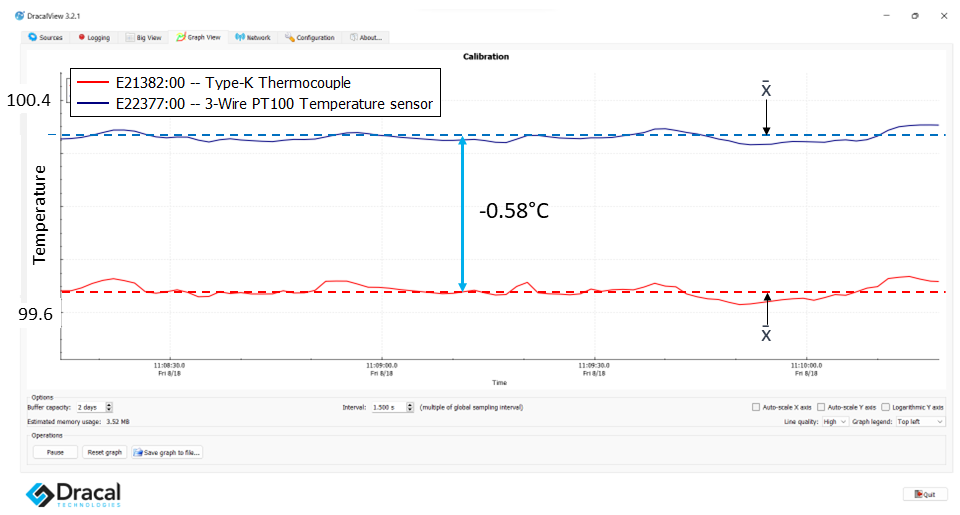
Another thing to note is that the temperature difference is not constant, depending on the temperature conditions (6°C, 25°C, or 100°C). That's why we offer a 3-point calibration mechanism: it truly allows for a better adjustment.
Note: The USB-TMC200k-CAL with the probe has an accuracy of ±2.5°C over its entire temperature range. It is well within its technical specifications, especially since the VCP-RTD300-CAL with the probe has an accuracy of ±0.351°C. Therefore, we could tolerate ±2.851°C difference between the two.
Perform Calibration Using DracalView
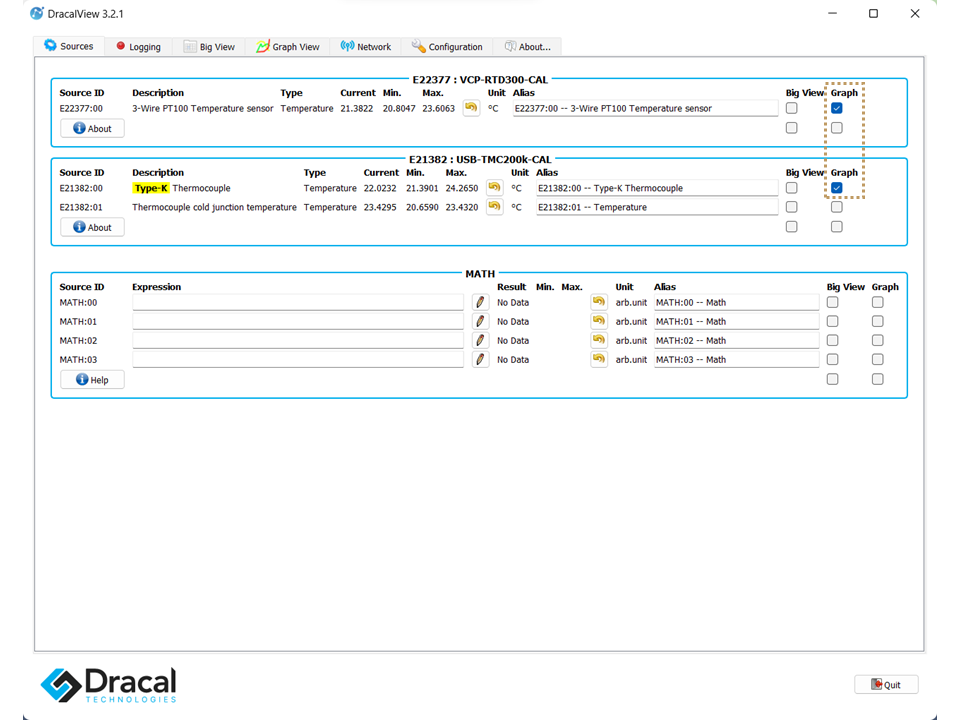
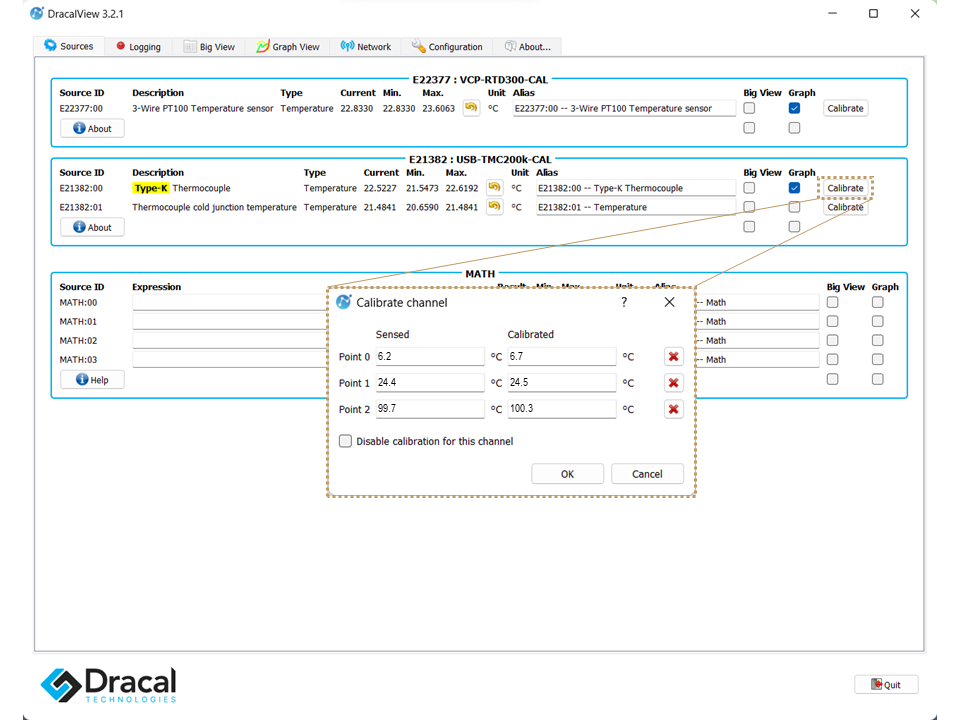
7. Click "Calibrate".
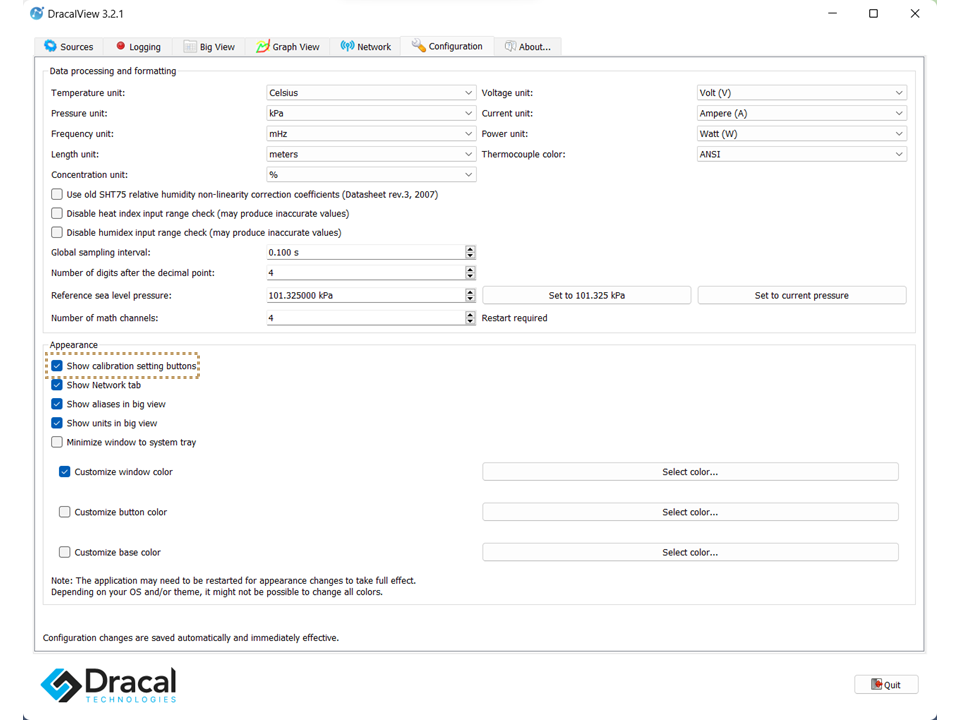
To access the calibration button for the desired instrument, go to the Configuration tab and check the "Show calibration setting buttons" box.
Then, click the Calibrate button.

8. Enter the data for the three conditions (instrument and reference for a given point).
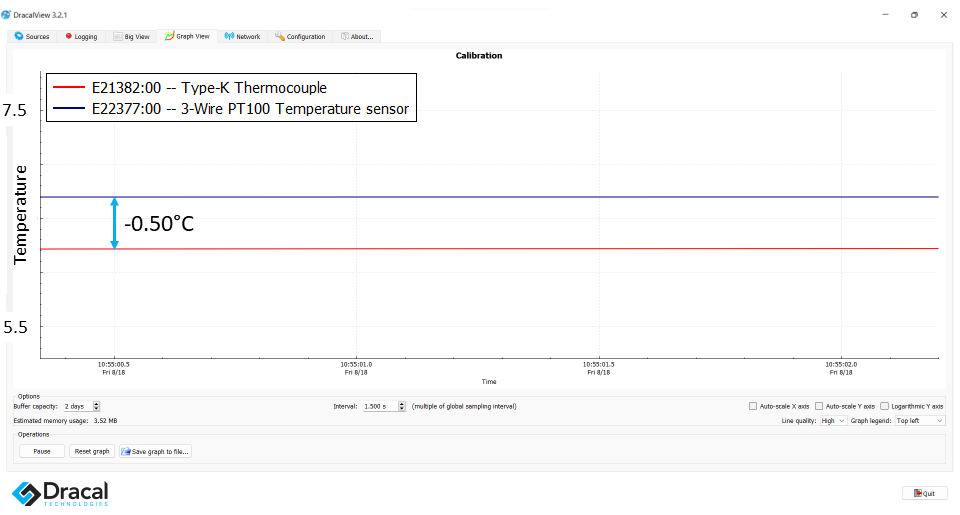
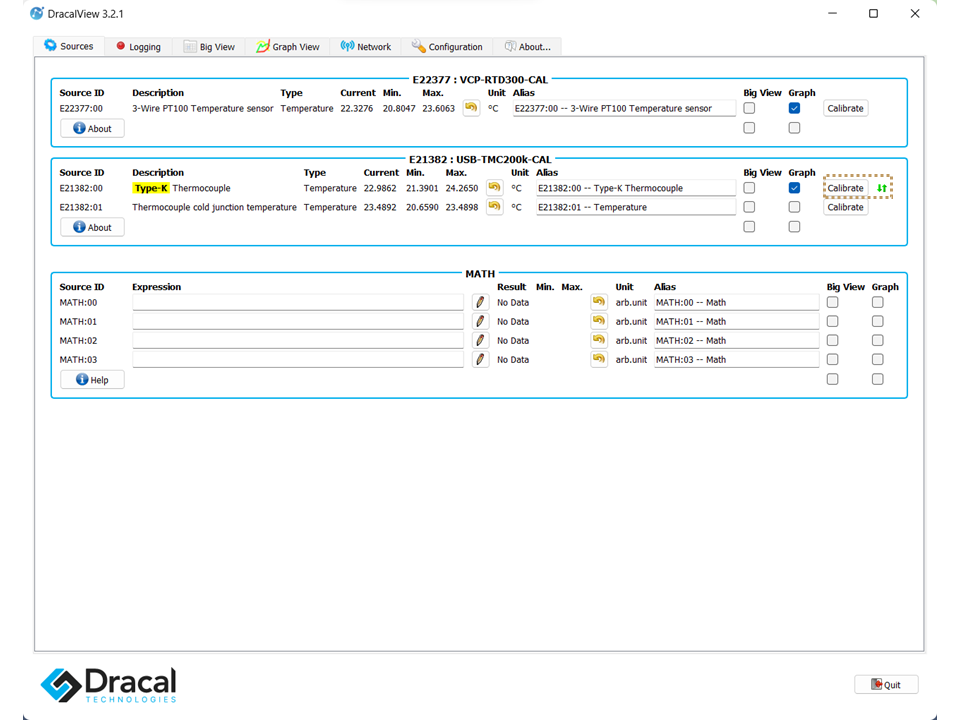
9. Check the calibration effect.
When calibration points are saved on the sensor, arrows appear next to the Calibrate button. These arrows are green if calibration is enabled and red if calibration is disabled.
Then, use the GraphView tab to visualize the calibration effect, as shown here.
Two video tutorials are available to see these steps in action: a quick tour and best practices.
For integrators who want to calibrate Dracal instruments with their own software
Prerequisites
Reference measuring instrument, often more accurate than the instrument to be calibrated OR instrument on which the new instrument should be aligned
AND
The latest version of dracal-usb-cal (available with the Download of DracalView)
Determine Calibration Points
1 to 6 are identical: perform using DracalView if your standard is a Dracal instrument
Perform Calibration Using dracal-usb-cal
7. Open a terminal.
8. Navigate to the command-line tools.
9. Type dracal-usb-cal and follow the documentation.
What to Pay Attention To
- Avoid drafts.
The precision of Dracal measuring instruments is such that even a slight variation in temperature or humidity will be noticed and can distort the calibration data. Therefore, it is ideal to place the instruments in a closed chamber. If this is impossible, at least avoid areas with frequent airflow or air entry/exit.
- Respect the instrument's measurement limits.
The measurement range of each instrument is indicated in each of the downloadable data sheets on our website. It is crucial to adhere to this range to avoid damaging the electronics and rendering your instrument unusable.
- Respect the number of significant decimal points.
The data sheets for each instrument indicate accuracy, which can be 1, 2, or 3 decimal places. You can record measurements with 6 significant digits during calibration, regardless of your instrument's precision. Referring to the manufacturer's announced precision is relevant to determining the number of decimals to include in the adjustment stage.
- Follow the order of calibration for measurement types.
If your instrument needs to be calibrated for pressure, humidity, and temperature, it is essential to start with temperature calibration, then humidity and then pressure. Since relative humidity must be calibrated at a specific temperature, it is necessary to calibrate (and adjust) the instrument for temperature measurement first. Then, as atmospheric pressure is stable at a given temperature and relative humidity, calibration must be completed for these two parameters before barometric calibration.
- Ensure stable measurements during data collection.
It is necessary to ensure that the reference instrument and the instrument to be calibrated have a constant reading at each calibration point or at least a consistent difference. This will provide the best precision when calculating the calibration curve.
- Avoid condensation conditions.
For a reminder of the dew point concept, follow the link. In summary, the dew point is the temperature at which air moisture condenses (liquefies). The appearance of water droplets on measuring instruments will prevent them from functioning. It is, therefore, essential to avoid reaching the dew point during calibration. It is also suggested to place the probe "head down" so that if condensation does form, it will flow away from the instrument rather than towards the sensor.
In conclusion, Dracal Technologies' 3-point user calibration mechanism, offered in its software suite, gives you complete control over your measurements. If you want to learn more about why we prefer a 3-point calibration mechanism or some additional tips to ensure the best possible calibration, we invite you to consult the relevant links.