Introduction
The majority of Dracal Technologies’ precision sensors can be delivered with the VCP mode: Virtual COM Port option. This option allows the instrument to communicate by serial COM protocol in addition to the default USB protocol. The commands available in VCP mode are available in the following documentation: Access Data from your VCP (Virtual COM Port) Dracal Sensors. The present documentation is intended as a complementary tool to guide users step-by-step through the process of getting their Dracal VCP instruments up and running on Windows or Linux.
Disclaimer: This documentation offers one possible avenue of use and in no way claims to be the only, or the best, of all possible options.
[Last update: 29/08/2025]
[Based on the DracalView Software version: v3.4.2]
- User on Windows
- 1. Installation
- 2. Navigate in the DracalView directory
- 3. Switching from USB to VCP mode
- 4. Find the COM identifier of your sensor
- 5. Communicating with the instrument while in VCP mode – Configuring PuTTY
- 6. Logging data with PuTTY
- 7. Using DracalView and command-line tools again: convert back to USB
- Conclusion under Windows
- User on Mac OS
- User on Linux
Users on Windows
1. Windows – Installation
When you receive your sensor supporting the VCP option, it is in “USB” mode. The first step to get your instrument up and running is to download the DracalView software, which includes all of our command-line tools in addition to the graphical interface.
Note: In DracalView versions 3.3.2 and earlier, the software was automatically installed in the C:Program Files (x86) directory. Starting with version 3.4.2, the default installation folder is C:Program Files. However, to ensure backward compatibility, a path in Program Files (x86) has been maintained.
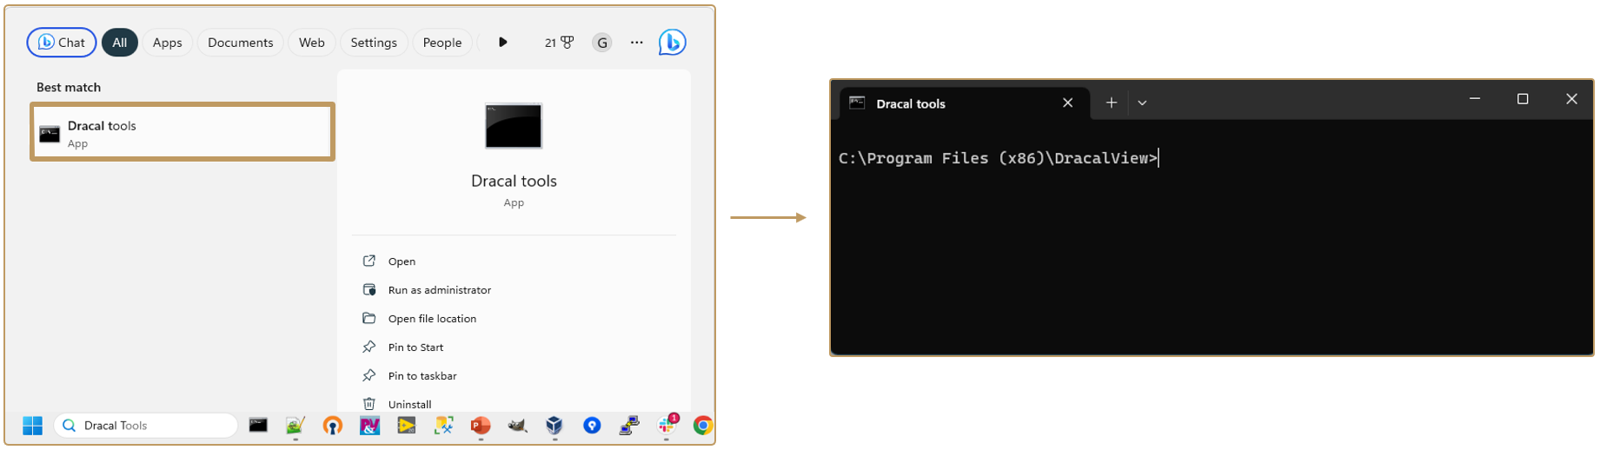
2. Windows – Navigate in the DracalView directory
When you download the software, the default directory where the software is downloaded is: C:Program FilesDracal. To use the command-line tools, you must open a terminal and navigate in this directory. Dracal Technologies has provided a tool called “Dracal tools” (“command-line tools” in former versions of the application) that you can call from your search bar and which, when you click on it, will open a terminal already positioned in the right place:
3. Windows – Switching from USB to VCP mode
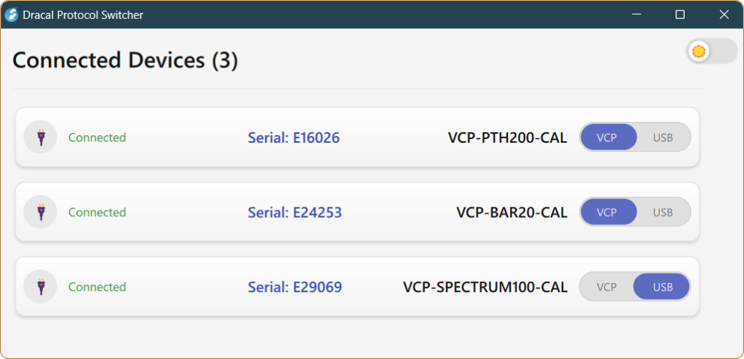
The communication protocol of the VCP-series products can be changed from USB to VCP mode in two different ways. The first (and easiest) method is to use the tool named ProtocolSwitcher.exe, available with DracalView versions 3.4.2 and following. You will find this tool in the DracalView directory, and with a single click it will allow you to switch protocols.
For users with previous versions of DracalView, you will switch protocol via our command-line tool dracal-usb-set (quick start-up guide with command-line tools here). To do this, the set_protocol VCP conversion command must first be executed, followed by the disconnection of the instrument. In the following example, the disconnection of the instrument was performed virtually via the reset command available with dracal-usb-set:
C:Program FilesDracalCmd>  dracal-usb-set -s E16026 set_protocol VCP
C:Program FilesDracalCmd>  dracal-usb-set -s E16026 reset
If only one Dracal instrument is connected to your computer at the time these commands are executed, you can omit specifying the serial number of your instrument (since there is only one) by using the -f option as in the following example:
C:Program FilesDracalCmd>  dracal-usb-set -f set_protocol VCP
C:Program FilesDracalCmd>  dracal-usb-set -f reset
Notes for Windows users: Upon execution of the reset command, the following echo will be returned in your terminal tool:
C:Program FilesDracalCmd>  dracal-usb-set -f reset
USB control message error: usb_control_msg: sending control message failed, win error: The device does not recognize the command.
This behavior is normal and confirms that the disconnection has been successfully completed.
Once switched to VCP mode, all DracalView software tools (GUI and command-line tools) will no longer be able to communicate with your Dracal instrument. This is a particularity of the Windows operating system that imposes this constraint, as it does not allow a device to communicate in multiple languages. This constraint does not exist under Mac OS and Linux.
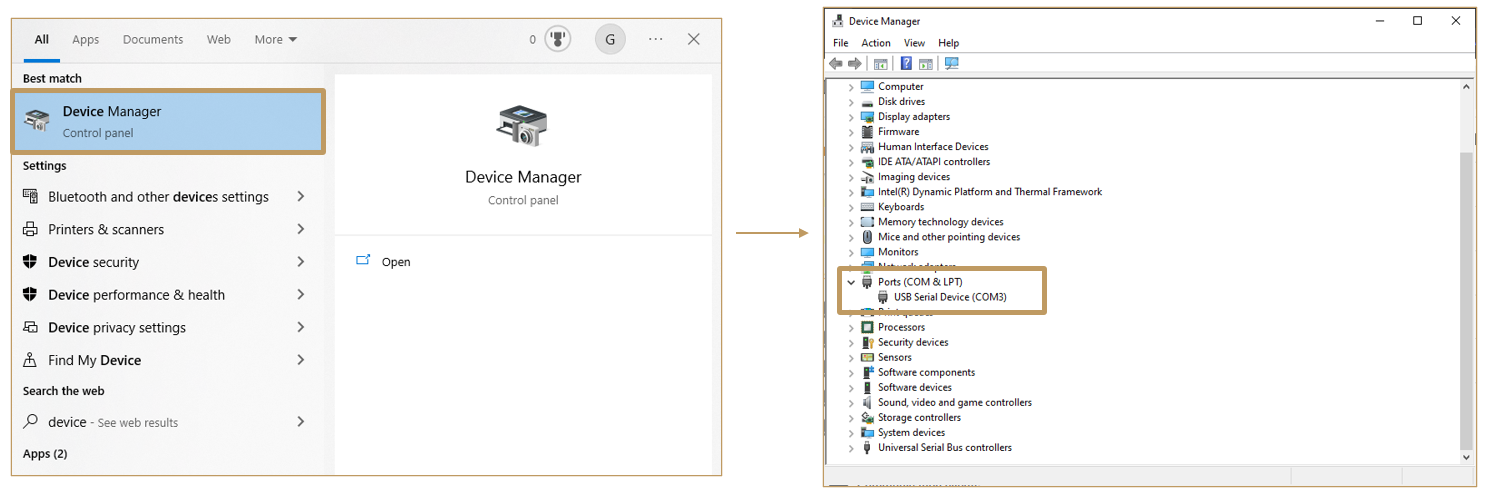
4. Windows – Find the COM identifier of your sensor
Use your Windows search bar to access your “device manager”. In this window, navigate to the “Ports (COM & LPT)” section. In the image below, for example, the connected Dracal sensor is identified as “COM3”:
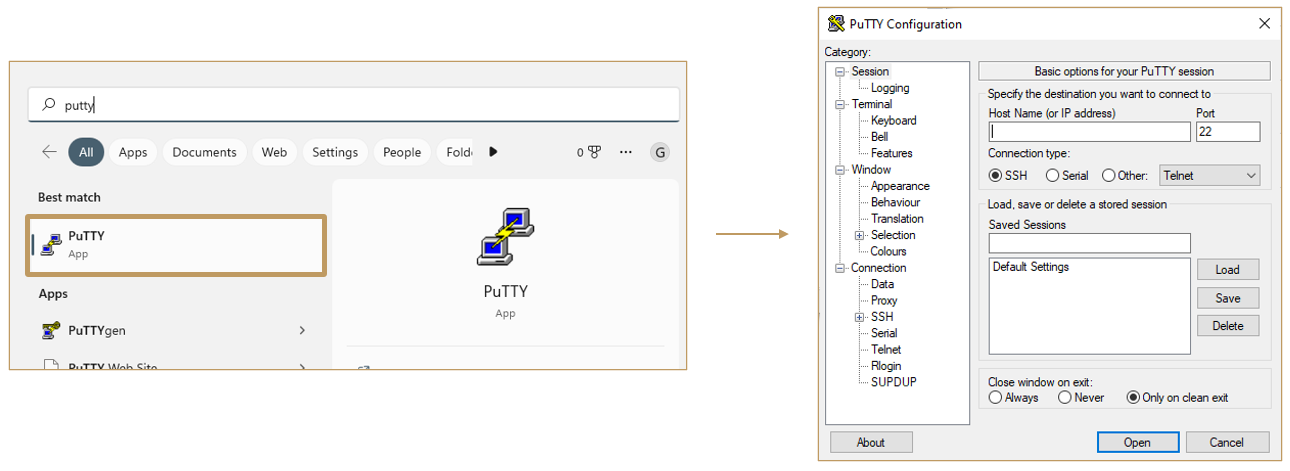
5. Windows – Communicating with the instrument while in VCP mode – Configuring PuTTY
As neither DracalView nor the command-line tools allow us to interacts with the instrument once it is in VCP mode, we will use PuTTY as a communication intermediary. You can download it here: https://putty.org/ and follow the default installation steps. After installing it, you should have access to it through your search window:
To access the device data, we will create a new profile in PuTTY with “Serial” as the connection type. Then, in the “Serial line” field, we will enter the name of our device, having been previously identified as COM3 in this example. It is recommended that you immediately save the session by giving it a name, such as “Dracal COM” for example:
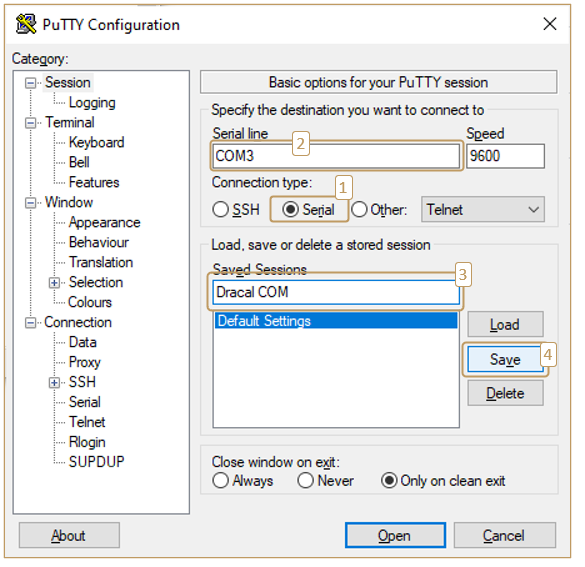
Before querying the instrument, we need to make other configurations.
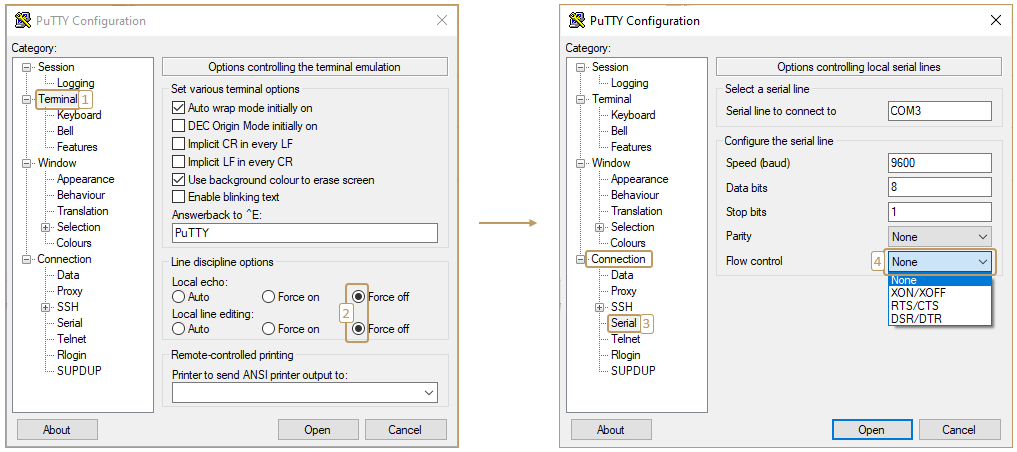
Under “Terminal”, we disable the echo by checking “Force off” in both options under “Line discipline options”. Then, under “Connection->Serial”, we deactivate the “Flow control” by selecting “None”:
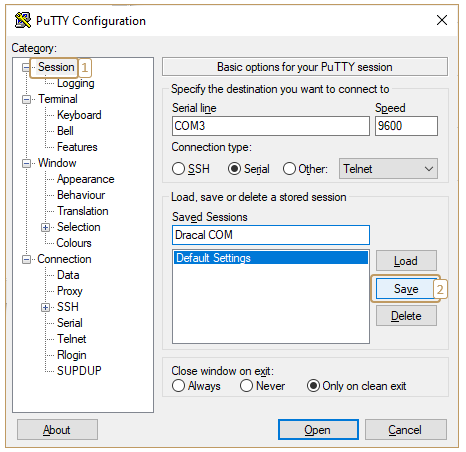
The configuration settings are complete. Go back to “Sessions” and save again:
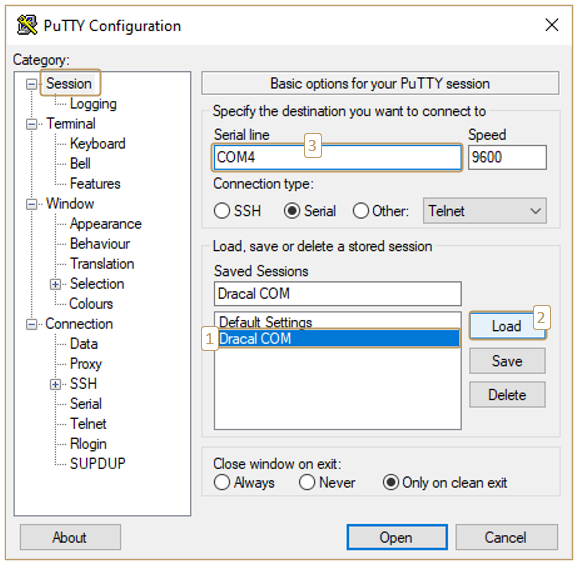
Note: When you launch your next PuTTY session to access data from your Dracal sensors, simply select your “Dracal COM” session and click “Load”. Then, you will just have to make sure to enter the correct serial identifier of the instrument in question, which will most likely have another identifier (which is COM4 in the image below for example):
You are ready to query your instrument by clicking on “Open”:
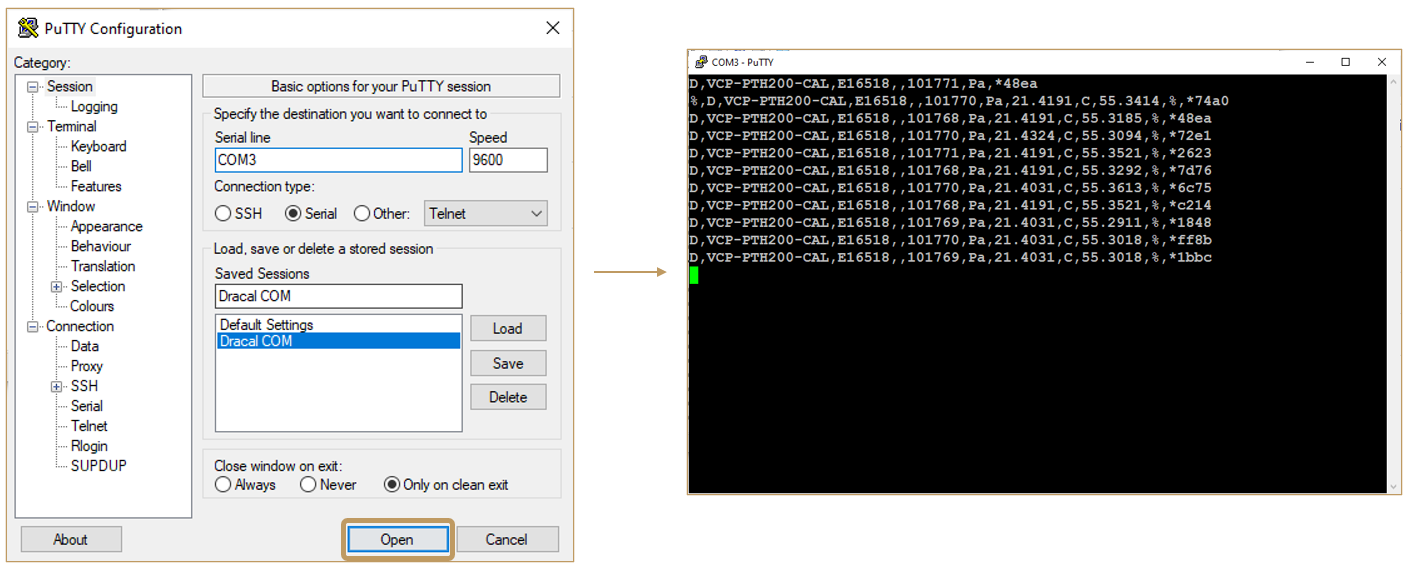
A window will then open, allowing you not only to view the data returned by your instrument, but also to interact with it by calling all the commands it supports and which are documented in this section of the VCP product user guide. Starting with the INFO command is always a good idea.
Calling the USB PROTOCOL command followed by the RESET command will switch your instrument from VCP mode to USB mode, allowing you to use the visualization and data acquisition tools available in the DracalView software.
Note: When calling the different commands in the terminal, although they will not be displayed in the terminal screen, they will be executed and an echo line will confirm that they have been received.
6. Windows – Logging data with PuTTY
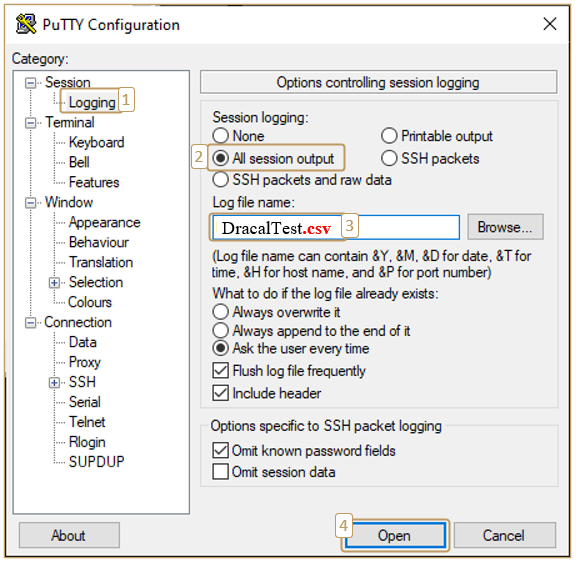
To save the data to a file, simply navigate to “Session -> Logging”. Under “Session logging:”, we recommend checking the “All session output” option. Then you need to choose the name of the output file and its location in the “Log file name:” section. In the example below, we have imposed “.csv” for the output file format, otherwise PuTTY proposes a “.log” extension by default. Finally, just click on “Open”:
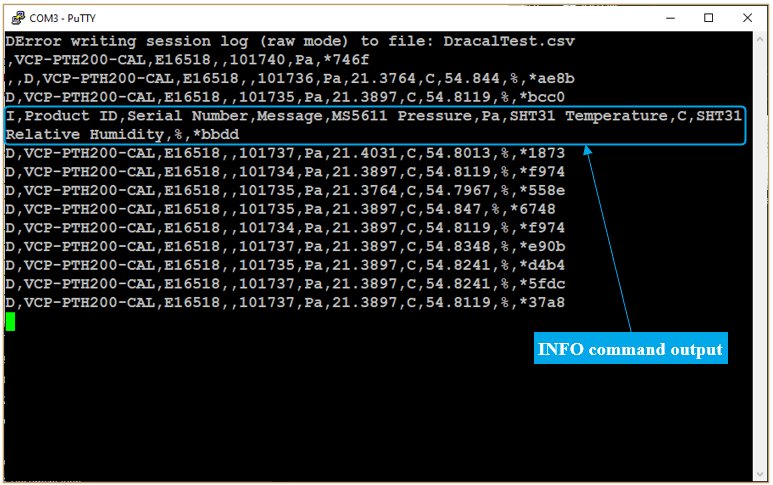
When the window opens, we recommend that you quickly invoke the “INFO” command so that the names of the columns can be identified very quickly when the log file is opened:
Leave the window open: the file is being written to. When your data acquisition task is complete, you can simply close the PuTTY window and open the file you created.
Note: You will have to delete the first few lines of your file. If you invoked the “INFO” command as suggested, your column names will be available a few rows from the beginning of your file.
7. Using DracalView and command-line tools again: convert back to USB
At the moment of writing this article, DracalView and our Dracal command-line tools do not recognize Dracal VCP-communicating instruments. For users that need to access their instruments with these tools, for calibration purpose for instance, the instrument must be converted back to USB mode.
As for step 3, the simplest way to do it is to use again the ProtocolSwitcher.exe tool in the main Dracal directory. To use the tool, make sure you closed any process (PuTTY, DracalView, other) that could currently be pulling your sensor’s data.
Otherwise, you must open a terminal as in Step 5 and send the command PROTOCOL USB. This is the command to be used to convert the communication protocol from VCP mode to USB mode. In order for the conversion to be effective, the device must then be disconnected either manually or virtually using the command RESET.
Of note, these commands are case-sensitive and must be typed in capital letters.
Below is an example of the returned feedback after the invocation of the commands PROTOCOL USB followed by RESET:
D,VCP-PTH200,E16026,,101671,Pa,23.2883,C,25.9022,%,*46A1
D,VCP-PTH200,E16026,,101670,Pa,23.3017,C,25.7649,%,*1A9D
D,VCP-PTH200,E16026,,101671,Pa,23.2883,C,25.5314,%,*1361
D,VCP-PTH200,E16026,,101669,Pa,23.3017,C,25.3696,%,*CAF8
I,VCP-PTH200,E16026,Protocol set,,,,,,,*0D36                        (Invoking command: PROTOCOL USB)
D,VCP-PTH200,E16026,,101668,Pa,23.3017,C,25.2293,%,*8DC9
D,VCP-PTH200,E16026,,101669,Pa,23.315,C,25.1652,%,*C947
D,VCP-PTH200,E16026,,101669,Pa,23.3017,C,25.1499,%,*F5B5
D,VCP-PTH200,E16026,,101668,Pa,23.3017,C,25.1637,%,*DFB5
I,VCP-PTH200,E16026,Resetting device,,,,,,,*0710                    (Invoking command: RESET)
At this point, your product communicates again via USB protocol and Windows users can access their data again via our free data acquisition software and tools.
Conclusion under Windows
The Windows operating system requires users of Dracal instruments to switch between USB and VCP modes depending on whether the user wishes to use all of our data acquisition tools (USB mode) or to integrate data in VCP mode. If there are other items that you feel should be covered in this documentation, we warmly welcome your suggestions.
User on Mac OS
1. Mac OS – Installation
When you receive your sensor supporting the VCP option, it is in “USB” mode. The first step to get your instrument up and running is to download the DracalView software, which includes all of our command-line tools in addition to the graphical interface.
2. Mac OS – Navigate in the command-line tooles directory
Typically, the DracalView application will have been installed and placed in the Applications directory. In this case, the default directory for the Dracal command line tools will be:/Applications/DracalView.app/Contents/MacOS/. To use the command line tools, you need to open a terminal and navigate in this directory.
3. Mac OS – Switching from USB to VCP mode
The communication protocol of VCP- series products can be changed from USB to VCP using our dracal-usb-set command line tool (quick start-up guide with command-line tools here). To do this, the set_protocol VCP conversion command must first be executed, followed by disconnection of the instrument. In the following example, instrument disconnection has been performed virtually via the reset command available with dracal-usb-set. Below, the conversion is applied to the instrument with serial number E16026.
MyMac:MacOS user$ ./dracal-usb-set -s E16026 set_protocol VCP
MyMac:MacOS user$ ./dracal-usb-set -s E16026 reset
If only one Dracal instrument is connected to your computer at the time these commands are run, you can omit the serial number of your instrument (as there is only one) by using the -f option, as in the following example:
MyMac:MacOS user$  ./dracal-usb-set -f set_protocol VCP
MyMac:MacOS user$  ./dracal-usb-set -f reset
Once you’ve switched to VCP mode, you can continue to use DracalView’s other software tools (GUI and command line tools) without any problems. For example, with the VCP-PTH450-CAL device we have on hand, calling the dracal-usb-get tool will return the following result:
MyMac:MacOS user$  ./dracal-usb-get -s E16026 -l
Found: 'VCP-PTH450-CAL', Serial: 'E22196', Version 2.10, Channels: 7
	Channel 0: MS5611 Pressure [Pressure]
	Channel 1: SHT31 Temperature [Temperature]
	Channel 2: SHT31 Relative Humidity [Relative Humidity]
	Virtual Channel 256: Dew point [Dew point]
	Virtual Channel 257: Humidex [Humidex]
	Virtual Channel 258: Heat index [Heat index]
	Virtual Channel 262: Altitude [Height]
MyMac:MacOS user$
4. Mac OS – Determining the COM identifier of your sensor
In the terminal, the command ls -alF /dev/cu.* will give you the identifier of instruments connected to your computer communicating via the COM protocol:
MyMac:MacOS user$ ls -alF /dev/cu.*
crw-rw-rw-  1 root  wheel   18,   7  6 Jul 13:51 /dev/cu.usbmodemE221961
In this example, the instrument identifier is /dev/cu.usbmodemE221961.
5. Mac OS – Interacting with the sensor in VCP mode
In order to follow the effect of the commands, we recommend opening a second terminal (identified hereafter as Terminal #2), which will be the place where the instrument data will be displayed. Thus, Terminal #1 will be the one from which we issue commands to the instrument, and Terminal #2 will be the one from which we observe their effects:
| Terminal #1 | Terminal #2 |
|
|
Note: We will use the “cat” tool to read data from the sensor, but other tools such as “screen” are also available.
In Terminal #2, start reading the data transmitted by your sensor by issuing the cat [identifier] command (in this example, [identifier] is /dev/cu.usbmodemE221961):
| Terminal #1 | Terminal #2 |
|
|
You can now run all the commands available in the VCP documentation in Terminal #1 and view their effect in Terminal #2.
For example, below we’ll retrieve the column names via the INFO command. The command echo "INFO" > /dev/cu.usbmodemE221961 is run in Terminal #1 and its effect is observed in Terminal #2:
| Terminal #1 | Terminal #2 |
|
|
Similarly, we can slow down the sensor polling frequency to one reading every 2 seconds, for example, via the POLL command:
| Terminal #1 | Terminal #2 |
|
|
We encourage you to continue configuring your instrument by familiarizing yourself with the commands available by following the 2 examples above, i.e. by running the command in Terminal #1 as follows: echo "[COMMAND]" > [IDENTIFIER] and observing the result in Terminal #2.
6. Mac OS – Logging in a file
To save data to a file, simply redirect the returned data to a file. In the example below, data from the queried instrument is saved to a file named log.csv, which is read later:
MyMac:MacOS user$  cat /dev/cu.usbmodemE221961 > log.csv

^C
MyMac:MacOS user$  cat log.csv
C,VCP-PTH450-CAL,E22196,,101403,Pa,*2aed
,,C,VCP-PTH450-CAL,E22196,,101397,Pa,25.7878,C,69.1859,%,*4622
C,VCP-PTH450-CAL,E22196,,101398,Pa,25.7878,C,69.1859,%,*83ed
C,VCP-PTH450-CAL,E22196,,101399,Pa,25.8011,C,69.2119,%,*7d65
C,VCP-PTH450-CAL,E22196,,101400,Pa,25.8011,C,69.189,%,*2760
Note #1: Note that the first 2 lines here are incomplete. This behavior is normal, since the start of the recording is not exactly synchronized with the capture of a new reading. Simply ignore the first few lines.
Note #2: The log file also records the echo returned by the sensor when commands are sent. For example, in the example below, the echo of the three commands issued in Terminal #1 is written to the log.csv file. This is particularly interesting when sending the “INFO” command, which inserts the names of the various columns into the file:
| Terminal #1 | Terminal #2 |
|
|
|
|
| [WAIT] | [WAIT] |
|
Conclusion under Mac OS
Under Mac OS, Dracal instruments are not limited by the instrument’s communication mode, whether USB or VCP. So a Mac user will probably be able to rotate his instrument to VCP mode and never need to convert it back to USB mode. To access data via terminal, we recommend using two separate terminals, one for sending commands and the other for reading data.
User on Linux
1. Linux – Installation and compilation
Upon receiving your sensor with VCP support, it is in “USB” mode. The first step to get your instrument up and running is to download and compile the DracalView software, which includes both the graphical interface and the suite of command-line tools.
Make sure you are part of the “dialout” group by executing the command sudo usermod -a -G dialout $USER, and verify that it has been applied successfully by validating that the command groups $USER (where the username is “user” in this case) returns “dialout” among its results.
user@MyLinux:~$ sudo usermod -a -G dialout $USER
user@MyLinux:~$ groups user
user : user adm dialout cdrom sudo dip plugdev lpadmin sambashare
2. Linux – Navigating to the DracalView directory
During the compilation process in the previous step, you determined the location of the Dracal tools (e.g., Desktop/MyDracal/DracalView-3.2.1/) and navigated to the directory where the tools are located (e.g., Desktop/MyDracal/DracalView-3.2.1/client/build/bin/). From there, you can invoke the command-line tools, including the dracal-usb-set tool used to convert the communication protocol from USB to VCP:
user@MyLinux:~/Desktop/MyDracal/DracalView-3.2.1/client/build/bin$ ls
dracal-sensgate-get  dracal-sensgate-logtool  dracal-sensgate-scan  dracal-usb-cal  dracal-usb-get  dracal-usb-set
3. Linux – Switching from USB mode to VCP mode
The communication protocol of VCP series products is switched from USB mode to VCP mode using our command-line tool dracal-usb-set (quick start-up guide with command-line tools here). To do this, the set_protocol VCP conversion command must be executed first, followed by disconnecting the instrument. In the following example, the instrument is virtually disconnected using the reset command available with dracal-usb-set.
user@MyLinux:~/Desktop/MyDracal/DracalView-3.2.1/client/build/bin$ ./dracal-usb-set -s E16026 set_protocol VCP
user@MyLinux:~/Desktop/MyDracal/DracalView-3.2.1/client/build/bin$ ./dracal-usb-set -s E16026 reset
If only one Dracal instrument is connected to your computer when executing these commands, you can omit specifying the serial number of your device (as there is only one) by using the -f option, as shown in the following example:
user@MyLinux:~/Desktop/MyDracal/DracalView-3.2.1/client/build/bin$  ./dracal-usb-set -f set_protocol VCP
user@MyLinux:~/Desktop/MyDracal/DracalView-3.2.1/client/build/bin$  ./dracal-usb-set -f reset
Once switched to VCP mode, you will be able to continue using other software tools of DracalView (graphical interface and command-line tools) without any issues.
4. Linux – Determining the COM identifier of your sensor
In the terminal, the command ls -alF /dev/ttyACM* will provide you with the identifier of the devices connected to your computer using the COM protocol:
user@MyLinux:~$  ls -alF /dev/ttyACM*

crw-rw---- 1 root dialout 166, 0 Jul  4 17:00 /dev/ttyACM0
In this example, the identifier of the device is /dev/ttyACM0.
5. Linux – Interacting with the sensor in VCP mode
- Firstly, ensure that your access rights have been properly configured as mentioned here.
To effectively observe the effects of the commands, we recommend opening a second terminal (referred to as Terminal #2 below) where the instrument’s data will be displayed. Thus, Terminal #1 will be used to send commands to the device, and Terminal #2 will be used to observe their effects:
| Terminal #1 | Terminal #2 |
|
|
Note In Terminal #2, we will use the “cat” tool to read the sensor’s data, but other tools like “screen” are also available.
In Terminal #1, disable the device’s write echo:
| Terminal #1 | Terminal #2 |
|
|
Note: If you receive a permission denied message, try running the command again using sudo (sudo stty -F /dev/ttyACM0 raw -echo).
In Terminal #2, start reading the data transmitted by your sensor by running the command cat [identifier] (in this example, [identifier] is /dev/ttyACM0):
| Terminal #1 | Terminal #2 |
|
|
You can now execute any available commands from the VCP mode documentation in Terminal #1 and observe their effects in Terminal #2.
For example, below we retrieve the column names using the INFO command. The command echo "INFO" > /dev/ttyACM0 is executed in Terminal #1, and its effect is observed in Terminal #2:
| Terminal #1 | Terminal #2 |
|
|
Similarly, we can slow down the sensor polling frequency to a reading every 2 seconds, for example, using the POLL command:
| Terminal #1 | Terminal #2 |
|
|
We encourage you to continue configuring your instrument by familiarizing yourself with the available commands, following the two examples mentioned above. To do so, execute the command in Terminal #1 as follows: echo "[COMMAND]" > [IDENTIFIER], and observe the result in Terminal #2.
6. Linux – Logging in a file
To save the data to a file, you can simply redirect the returned data to a file. In the example below, the data from the queried instrument is saved to a file named “log.csv,” which is then read later on:
user@MyLinux:~$  cat /dev/ttyACM0  > log.csv

^C
user@MyLinux:~$  cat log.csv
C,VCP-PTH450-CAL,E22196,,101403,Pa,*2aed
,,C,VCP-PTH450-CAL,E22196,,101397,Pa,25.7878,C,69.1859,%,*4622
C,VCP-PTH450-CAL,E22196,,101398,Pa,25.7878,C,69.1859,%,*83ed
C,VCP-PTH450-CAL,E22196,,101399,Pa,25.8011,C,69.2119,%,*7d65
C,VCP-PTH450-CAL,E22196,,101400,Pa,25.8011,C,69.189,%,*2760
Note #1 Please note that the first two lines are incomplete in this case. This behavior is normal since the start of the recording is not precisely synchronized with capturing a new reading. You can simply disregard the first few lines.
Note #2 The recording file also saves the echo returned by the sensor when sending commands. For example, in the example below, the echo of the three commands executed in Terminal #1 is written in the log.csv file. This behavior is particularly useful for sending the “INFO” command, which inserts the names of different columns into the file.
| Terminal #1 | Terminal #2 |
|
|
|
|
|
|
| [WAIT] | [WAIT] |
|
Conclusion under Linux
In Linux, Dracal instruments are not limited by the instrument’s communication mode, whether it is USB mode or VCP mode. Therefore, a user on Linux can likely switch their instrument to VCP mode and no longer need to switch it back to USB mode. To access the data through the terminal, it is important to disable the echo on the instrument. Additionally, it is recommended to use two separate terminals, one for sending commands and the other for reading data.
Not sure if your project will benefit from Dracal’s solution?
Contact us, tell us about your project, and we’ll quickly determine if there’s a fit.
"*" indicates required fields
Always offered at no extra charge with our products!
EASY TO USE IN YOUR OWN SYSTEM
- Ready-to-use, accurate and robust real-time data flow
- Choose the interface that works best for you (CLI, virtual COM, REST API, MQTT Publisher)
- Code samples available in 10+ programming languages (Python, C/C++, C#, Java, Node, .Net, etc.)
- Operates under Windows, Mac OS X and Linux
- Usable with LabView (CLI guide, Virtual COM guide)
- All tools packaged within one simple, free of charge, DracalView download
FREE DATA VISUALIZATION, LOGGING AND CALIBRATION SOFTWARE
- Get up-and-running in less than 3 minutes
- Operates under Windows, Mac OS X and Linux
- Real-time on-screen graphing and logging
- Log interval down to 0.5 second and configurable units (°C, °F, K…)
- Simultaneous use of unlimited Dracal sensors supported
- Simple user-calibration (products with the -CAL option)
- Connectivity with SensGate Wi-Fi/Ethernet gateway
PRODUCTS YOU CAN TRUST
Approved by engineers, scientists and researchers around the world.
Thousands of companies trust our products worldwide: